HDZero Firmware Update
Download the latest Goggle firmware from HDZero download.
| Downloaded Firmware (.Zip file) | Zip File Content | Purpose | |
| HDZero Goggle 1 | HDZEROGOGGLE_ Revyyyymmdd.zip | HDZERO_GOGGLE_nnn.bin | To flash firmware from Goggle main menu |
| Recovery/HDZG_OS.bin Recovery/HDZG_BOOT.bin Recovery/HDZGOGGLE_RX.bin Recovery/HDZGOGGLE_VA.bin | For emergency recovery | ||
| HDZero Goggle 2 | HDZEROGOGGLE2_ Revyyyymmdd.zip | HDZERO_GOGGLE2_nnn.bin | To flash firmware from Goggle main menu |
| Recovery/HDZG_OS.bin Recovery/HDZGOGGLE_RX.bin Recovery/HDZGOGGLE_VA.bin | For emergency recovery |
TABLE 4. Goggle Firmware File
Flashing Firmware to the Goggle
The HDZero Goggle runs on Linux. Its firmware contains the customized Linux distribution and its application software. We only need to update the application instead of updating the whole OS and application in most cases. However, there are some rare cases where the OS could become corrupted, such as losing power during update process. It is also possible that changes may have to be made to the OS in the future to add new functionality.
Before you start to update firmware, go to Main menu|Firmware|Current version. It should be in the following format:
- n.xx.yyy, or

- app:n-xx rx yy va zzz
If n is greater or equal than 9, take Normal Goggle Firmware Update Process, otherwise take A Special One Time Goggle Firmware Update Process.
Normal Goggle Firmware Update Process (for n≥ 9)
Disconnect all cables from the goggle. Keep the power cable only;
Prepare the firmware file:
a. For Goggle 1: HDZERO_GOGGLE_nnn.bin
b. For Goggle 2: HDZERO_GOGGLE2_nnn.bin
Copy it to root directory of SD card that is formatted as FAT32, and make sure there is no previous firmware in the root directory;
Power on the goggle;
Go to Main menu | Firmware | Update Goggle, the display will show the current version;
Wait for the completion (about 3 minutes), then power off;
Done!
A Special One Time Goggle Firmware Update Process (for n < 9)
Disconnect all cables from the goggle. Keep the power cable only;
Extract HDZERO_GOGGLE- nnn.bin/HDZG_BOOT.bin/HDZG_OS.bin, and copy them to root directory of a FAT32 formatted SD card;
Insert SD card, Select Main menu | Firmware | Update Goggle. Power off after completion;
Power on goggle, wait for 2 min then power off;
Power on goggle, wait for 5 mins then power off;
Done!
TIP
Note: (1)HDZG_BOOT.bin/HDZG_OS.bin will be removed from SD card if update successfully. (2) Have to wait for the above specified time, DO NOT move to next step in a hurry.
The goggle can be bricked under some rare cases. If the goggle is on the firmware version n is 9 or later before bricked, follow Goggle Emergency Firmware Update Process; if n is earlier than version 9 or you are not sure which version it was on, please follow Goggle Emergency Firmware Update Process using Phoenix App using Phoeix App.
Goggle Emergency Firmware Update Process (for n≥ 9)
Disconnect all cables from the goggle. Keep the power cable only;
Extract HDZG_OS.bin/ HDZGOGGLE_RX.BIN/ HDZGOGGLE_VA.BIN, and copy them to root directory of a FAT32 formatted SD card, and insert SD card to the goggle;
Power on goggle, wait for 5 min then power off;
Done!
TIP
Note: (1)HDZG_OS.bin/ HDZGOGGLE_RX.BIN/HDZGOGGLE_VA.BIN will be removed from SD card if update successfully. (2) Have to wait for the above specified time, DO NOT move to next step in a hurry.
Goggle Emergency Firmware Update Process using Phoenix App (for all versions)
Download PhoenixCard.zip from the HDZero download site, and extract it to a location on a Windows machine, for example, C:\PhoenixCard. This is a one-time process. There is no Mac or Linux version for now.
Download the latest firmware package from the HDZero download site, and extract all files in the zip file to your local drive, i.e. C:\Temp.
Launch C:\PhoenixCard\PhoenixCard.exe;
Follow the steps on FIG.5 to make a bootable SD card;

FIG 5. Make a bootable SD Card
- Eject the SD card from Windows, and insert the SD card into the SD card slot of the goggle;
Unplug all of the cables, i.e., HDMI in/out, Line in/out, AV in. Keep the power cable only. Power on the goggle, you will hear a long beep im/gogglesmediately. Wait for 3 minutes and you will hear another long beep;
Power off the goggle, and pull out the SD card from the goggle. (Do not power on goggle now);
Follow the FIG.6 to restore the SD Card from BOOT mode, and format it as FAT32 on Windows;
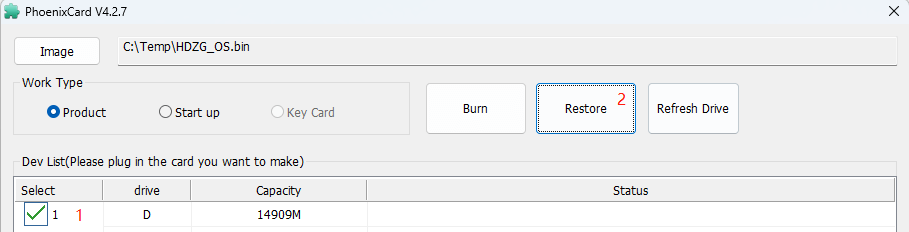
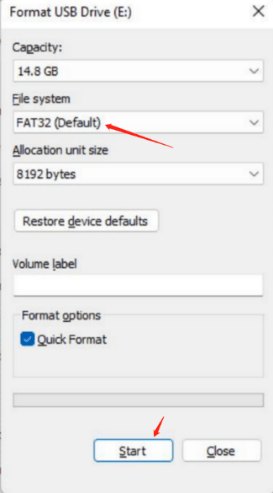
FIG 6. Restore a SD Card
Copy HDZGOGGLE_RX.bin and HDZGOGGLE_VA.bin to the SD card root directory;
Insert SD card into goggle, power on the goggle, wait for 2 minutes, and there will be a long beep;
(Optional) Pull out the SD card, and check SD card contents on the PC. The 2 files should be removed if flash process is successful;
Power the goggle off and then on again.
TIP
Notes:
(1) A bootable SD card has a hidden partition that Windows Explorer will not show. And it can’t be removed even SD card is formatted with Windows Explorer. It means the goggle will flash itself from the bootable SD card unexpectedly and mess up goggle firmware if a bootable SD card is inserted when the goggle is powered on.
(2) The above Step (5) must be followed strictly to get rid of the hidden bootable partition. Otherwise, it will brick the goggle when goggle is powered with this SD card inserted. If this happens, you will need to repeat the emergency firmware update process described in this section.
(3) Have to wait for the above specified time, DO NOT move to next step in a hurry.
(4) When the goggle is bricked, it shows HDZero Boot screen and will not get into Main menu.
Flashing Firmware to a HDZero VTX
The HDZero goggle can flash firmware to a HDZero video transmitter via its FW port. Here are the steps:
To flash a single VTX:
Copy HDZERO_TX.bin to root directory of a SD card that is formatted as FAT32
Power on the goggle
Connect the VTX and HDZero goggle with the included programming cable
Go to Main menu | Firmware |Update VTX, the display will show the status of the flashing process
Disconnect the VTX
This VTX is now flashed with the latest firmware
To flash multiple VTXes of the same type:
Copy HDZERO_TX.bin to root directory of a SD card that is formatted as FAT32
Power on the goggle
Connect one VTX to the HDZero goggle with the included programming cable
Go to Main menu | Firmware | Update VTX, the display will show the status,
Disconnect the VTX, this VTX is flashed
Repeat 3-5 for the other VTXes
TIP
Note:
Flashing VTX firmware with Goggle is highly not recommended for Goggle safety consideration. HDZero Programming Cable is preferred for its convenience and safety. However, a Windows system is needed to run the HDZero Programmer app, Mac is not supported for now.
 Eason FPV