HDZero Goggle Operation
This section describes the general operation of the HDZero goggle.
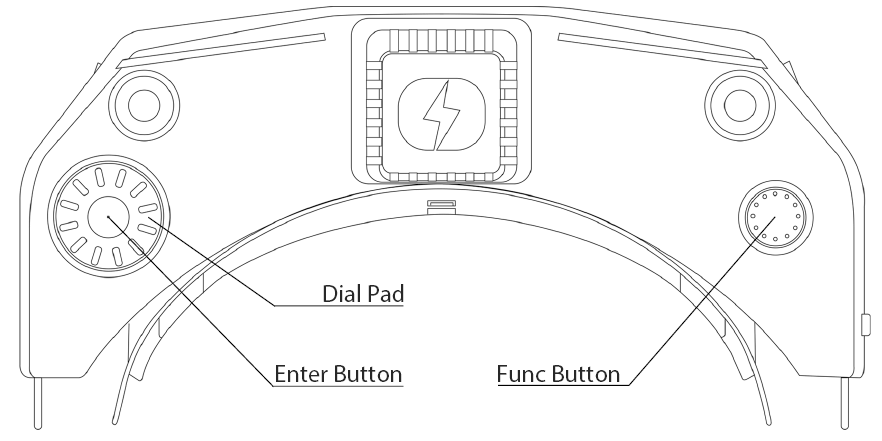
Controls
Dial Pad
Enter Button
Func Button
Video view and Menu view
Video Source
The HDZero goggle can display video from any of 5 sources:
Built-in HDZero digital receiver
Built-in Analog receiver (appliable to Goggle 2 only)
AV in
Expansion Module in (such as with an analog video receiver)
HDMI in
HDZero Digital Receiver
The “Scan Now” option on the main menu will scan the following channels for an HDZero video signal:
R1-R8, E1, F1, F2, and F4 channels, or
L1-L8 if low band is selected
“Scan Now” will perform the following:
Scan the above channels,
Lock on to the channel if there is only one valid channel with a signal, or
Let you choose between the channels if it has found two or more channels, or
Continue to scan after 5 seconds if no signal is detected, or
Wait for a long press of the Enter button to exit to the main menu
TIP
Notes:
- To enable low band, (1)VTX side: Set to Lowband at VTX menu, (2) Goggle side: set Source -> HDZero Band to Lowband. Here are the center frequencies for L1-L8.
| Low Band Channel | L1 | L2 | L3 | L4 | L5 | L6 | L7 | L8 |
| Frequency (MHz) | 5362 | 5399 | 5436 | 5473 | 5510 | 5547 | 5584 | 5621 |
- Only Nano 90 camera supports 540p60 mode. When it is set to 540p60, the goggle needs to set Source > HDZero BW to Narrow. All other modes need to set Source > HDZero BW to Wide.
Analog Input
The HDZero goggle takes analog video input from (1) the AV input jack or, (2) the external Expansion Module (not included, available on the HDZero shop) or, (3) built-in analog receiver for Goggle 2. The goggle processes analog video from either of these inputs in the same way, but the Expansion Module provides an easy plug-and-play experience if you are using a standard FPV analog module. There is a soft switch available in the goggle menu to turn on the power to the module bay. This must be turned on for the module bay to be powered and is off by default.
The HDZero goggle uses a novel approach to process the analog input, resulting in improved analog video quality:
It uses a video decoder with an adaptive comb filter to separate Y/C from the composite video;
It uses a deinterlacer to convert fields to frames, instead of doubling the interlaced lines;
It uses an upscaler to record and display the video;
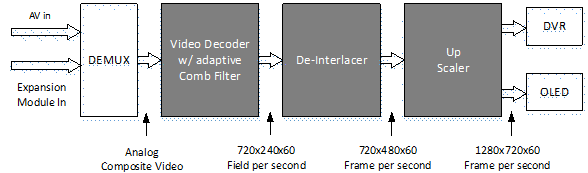
FIG 4. Signal Processing Path for Analog Input of Goggle 1
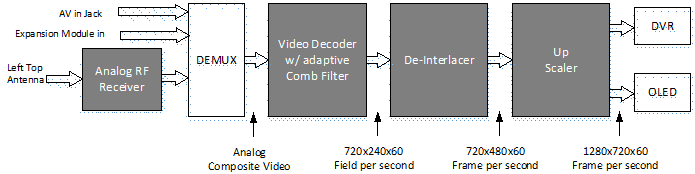
FIG 5. Signal Processing Path for Analog Input of Goggle 2
Fan Management
There is one fan on the top of the goggle and one fan on each side of the goggle. All fans are soft mounted to reduce vibration and noise. There are three temperature sensors on top and sides of the goggle.
These fans are critical to goggle performance:
The top fan provides cooling for the OLED displays and defogging for the optical lens;
The side fans provide cooling for the IO and RF boards inside the goggle
They will prevent goggle from being too hot, improving OLED life span and ensuring maximum HDZero RF performance.
Top fan can be set to a 1-5, and side fans for 2-9 level, corresponding from minimum to max speed.
There are two control modes for side fans:
Automatic mode: Goggle firmware will automatically speed up/down the fan on each side;
Manual mode: You can manually set the speed for each fan;
Regardless of the current mode, the goggle firmware will enter into rescue mode under these situations:
temperature sensor on top reports hot: top fan goes to max speed;
temperature sensor on left/right reports hot: left/right fan goes to max speed;
You can change the top fan speed by pressing and holding the Func Button. You can monitor the top fan speed changes on the goggle OSD to quickly change the amount of air blowing onto your face and the optic lenses while in the Video view.
TIP
Notes:
Only the side fans have automatic mode. The top fan is always in manual mode unless it is in rescue mode.
It is recommended to use automatic mode for side fans, and set top fan speed as desired level.
Image Settings
The HDZero goggle has an image processor to fine tune video before feeding to DVR and display. It includes:
Brightness
Saturation
Contrast
OLED Control
For OLED display, you may set OLED brightness to the desired level. Note that the OLED brightness setting applies to the OLED display only.
If the HDZero goggle detects no movement or no key input for programmed time (1/3/5/7 minutes), it will dim the OLED display as an alarm, and it will wait for another one minute before turning off both the display and HDZero digital receiver with a short beep. The OLED display and HDZero receiver will resume normal operation if the goggle detects movement or any key input. This feature can be disabled by setting the waiting time to “Never”.
OLED displays can provide more vivid colors than traditional LCD panels, However, if they are displaying the same content for an extended period of time, it may come across issues like "Image retention" or "Image burn-in". It is highly recommended to use the above OLED auto off feature or “Go Sleep” from main menu to turn off OLED while not using the goggle.
DVR
The HDZero goggles integrates a DVR for both the HDZero digital receiver and analog input. These are the DVR options:
Automatic Record: DVR will start to record when it detects there is valid HDZero RF on the current channel, and stops recording when the signal is no longer detected.
Manual Record: DVR will start/stop only if Func button is clicked.
MP4 format or TS format: MP4 format is better supported by many video editing applications. However, MP4 files can be corrupted if the goggle loses power before the file is closed after recording, which can happen if the goggle runs out of battery or the power cord is unplugged unexpectedly. Unlike the MP4 format, the TS format saves the stream instantly to DVR without any risk of corrupted files, even if the goggle suddenly loses power. TS format is preferred.
H264/H265. The DVR must use the H264 format when recording 90fps video (it records in 1280x720x90 for better quality). It uses the H265 format in all other cases.
Audio: You can choose to record audio or not. There are 3 audio sources that can be recorded:
Built-in microphone
Line in (From Line in/out port, usually from an external MIC)
AV in (From AV in Jack or built-in analog receiver audio output)
The file system on SD card can be corrupted by suddenly power off while goggle is writing data to it.
HDZero Goggle operates on a Linux-based system, and it is unable to store final emergency data when powered off abruptly. This can result in corrupted SD card file systems and video files that won’t play. Here are tips on how to avoid powering off while recording is ongoing:
Auto record mode: after quad is landed, do one of the following
Long press “Enter” button to switch to menu mode, then power off the goggle, or
Power off quad first, and wait for 10 seconds, then power off the goggle
Manual record mode: Click “Func” button to stop DVR before power off the goggle
Select “Scan and Fix” if Windows or Mac reports problem when SD card is inserted.
TIP
Note: It is convenient to start/stop DVR with ELRS backpack function. See ESP32/Backpack Module.
TABLE 3: DVR resolution
| Input Source | Recording resolution | Encoder | |
| 1 | HDZero 60fps Camera | 1280x720x60fps | H.265 |
| 2 | HDZero 90fps Camera | 1280x720x90fps | H.264 |
| 3 | NTSC | 1280x720x59.97fps | H.265 |
| 4 | PAL | 1280x720x50fps | H.265 |
| 5 | HDMI in | The same as input resolution and frame rate | H.264 |
Playback
The HDZero goggle can play back DVR recordings.
The player lists the recent recording first. Use Dial up/down to select a file, and click to play it
On controller bar, use Dial Up/Down to seek video (5 seconds forward/backward), and click to play/pause
Long press the Enter button to exit the controller bar, and long press Enter again to exit the player.
TIP
Notes:
The player will ignore files that are less than 5MB.
The playback feature is designed for quick review—whether checking a recording or locating the final moments of a lost drone. Please note that it does not play back at full frame rate.
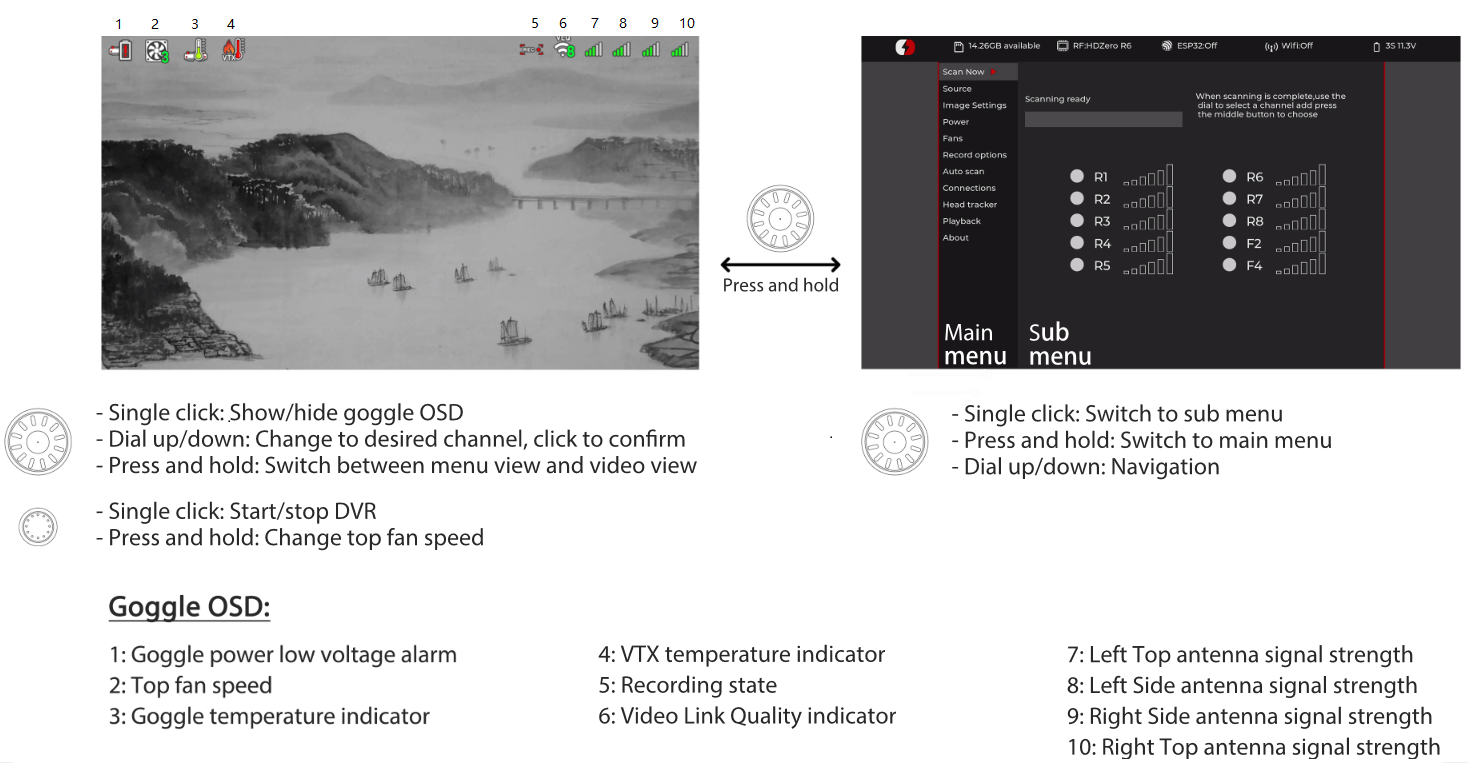
OSD
The goggle supports OSD from flight controller (FC OSD) and OSD of its own status (Goggle OSD). You may select if both OSD should be recorded with video stream at Record Options sub-menu.
Goggle OSD can be shown/ hidden by clicking the Enter button under Video view. The positions of Goggle OSD items are fixed on current firmware.
The goggle has built-in OSD fonts for BetaFlight, Arduino and iNav. It will automatically load the corresponding font according to type of flight controller that is connected with HDZero video transmitter. You can also customize FC OSD by putting bitmap files under SD card root directory/resource/OSD/FC.
Tune Channel
By Dialing up/down, video channel number can be tuned on video mode for HDZero receiver, or built-in analog receiver on Goggle 2. However, this can be disabled by putting a file named as “no_dial.txt” on SD card root directory when booting up.
The video channel number can also be tuned by ELRS backpack as described below.
ESP32/Backpack Module
The HDZero Goggle supports a built-in ESP32 Backpack that achieves:
Tune channel number of built-in HDZero
Tune channel number of built-in Analog receiver for Goggle 2
Wireless head tracking
Start/Stop DVR using a radio switch
Update ELRS backpack firmware
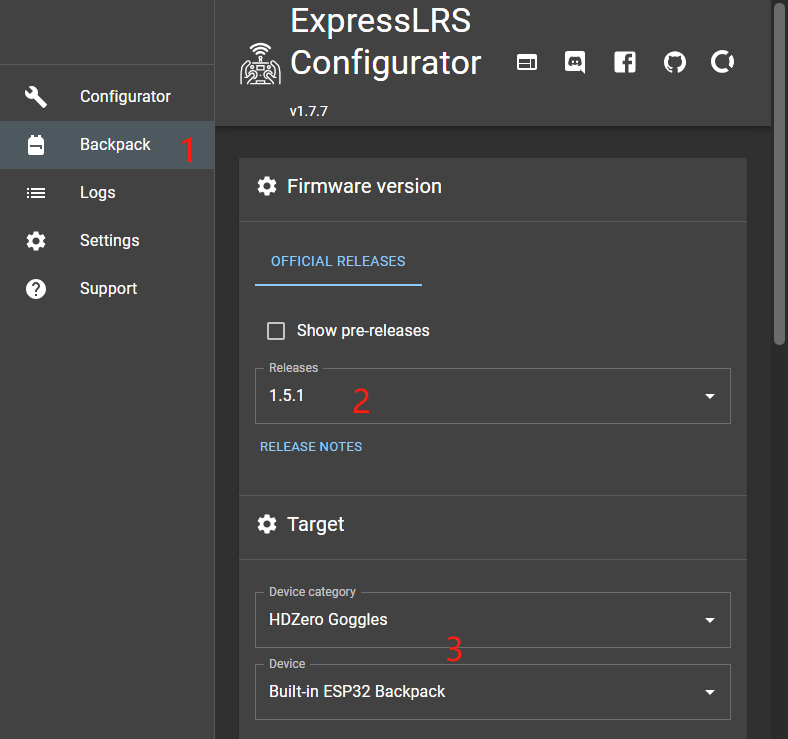
Install ExpressLRS Configurator from Releases
Open ExpressLRS Configurator to build firmware for goggle:
Switch to Backpack menu
Select the same release version with the radio backpack
Select target HDZero Goggles -> Built-in ESP32 Backpack
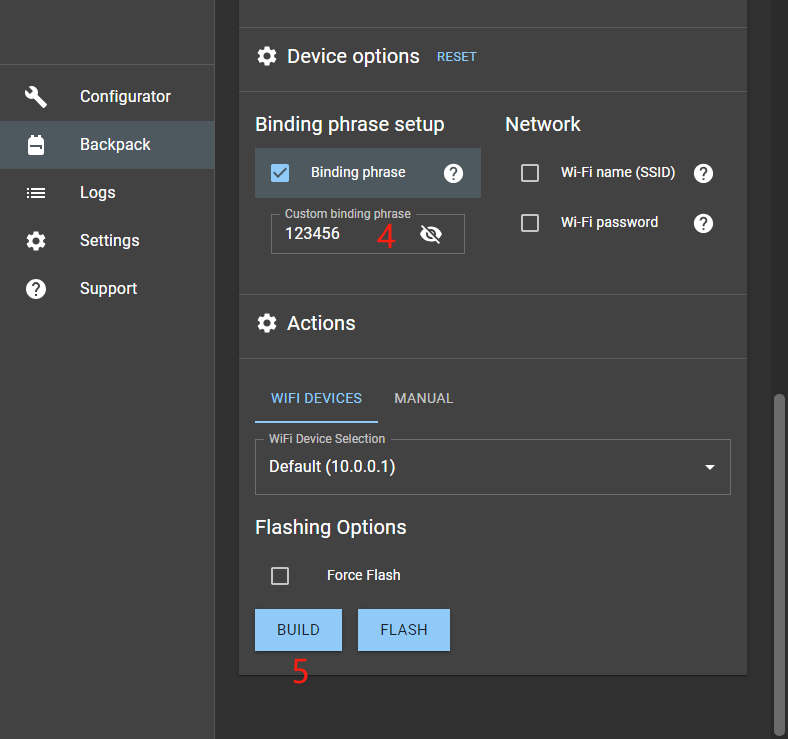
Set the same binding phrase as the radio backpack, otherwise your backpack needs to be bonded manually
Click “BUILD”. A folder will pop up automatically containing the following 4 files when completed. Copy them to “ELRS” directory under SD card root
a. boot_app0.bin
b. bootloader.bin
c. firmware.bin
d. partitions.bin
Insert SD card to HDZero Goggle
Goggle main Menu: Firmware -> Update ESP32 to flash Backpack firmware for the Goggle
Bind HDZero Goggle and ELRS TX
Please flash your ELRS Transmitter backpack firmware of Radio to the same version as HDZero Goggle Backpack firmware. Refer to Tx Backpack Setup.
If the binding phrase of goggle is different with Radio, it is needed to bind manually for first use.
Goggle: ELRS -> Backpack = on
Goggle: ELRS -> Bind
Radio: ExpressLRS Lua -> Bind
After a few seconds, the goggle will display success if the binding is complete.
Start/Stop DVR Using a Switch
The HDZero goggle supports start/stop recording using a switch on radio. Here are steps to setup on Goggle and Radio:
Goggle: Record Option -> Record Mode = Manual
Radio ExpressLRS Lua -> Backpack -> DVR Rec = AUXn↑ | AUXn↓, where n is aux channel number of the switch which is specified to start/stop Goggle DVR.
Set Channel Number Using Radio
The HDZero goggle supports set channel number using ExpressLRS Lua on radio. Here are steps to setup on Radio:
Enter Radio ExpressLRS Lua -> VTX Admin
Set Band and Channel you want to
Send VTx
Note: Channel number of both HDZero receiver and built-in Analog Receiver can be set by the method.
WiFi Module
The HDZero Goggle 1 expansion module V2 and Goggle 2 supports WIFI video streaming to smart phone, desktop or laptop. Multiple devices can wirelessly connect to the goggle and receive the video simultaneously.
Control over the behavior of the WiFi module is completely managed from within the WiFi Module page. Users have the ability to configure the goggle as a Host (Access Point) or a Client (Join Network).
WiFi Module page supports both “Basic” and “Advanced” configuration fields.
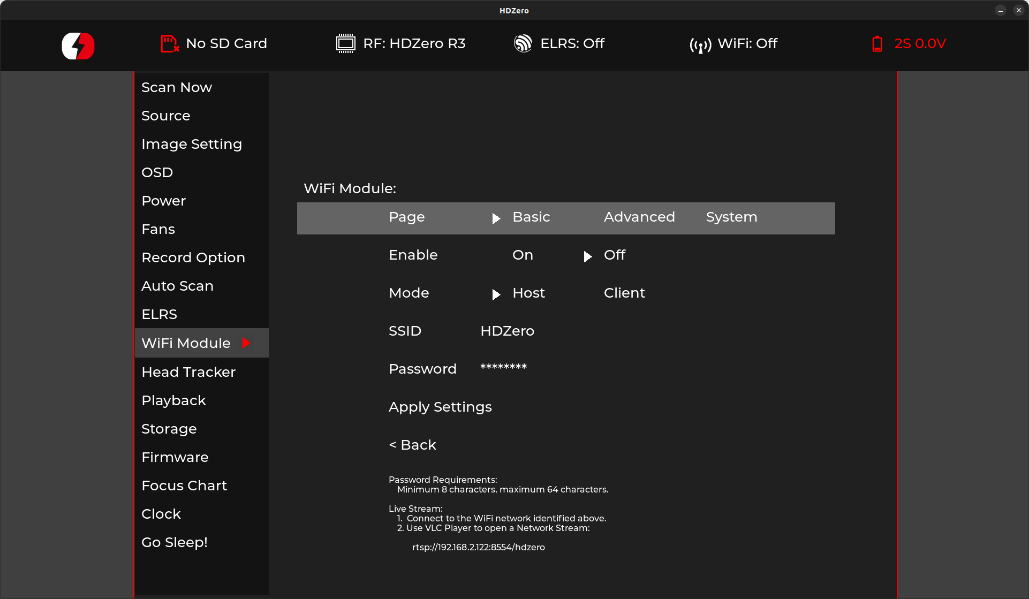
Basic Fields
Enable – Powers On or Off the WiFi Module hardware.
Mode – Host (Access Point) or Client (Join Network).
SSID – User can specify a Host and Client network names individually based on Mode.
Password – User can specify a Host and Client network password individually based on Mode.
Note that password requires a minimum of 8 characters.
Apply Settings – Stores and configures the WiFi Module hardware with the settings the user has modified.
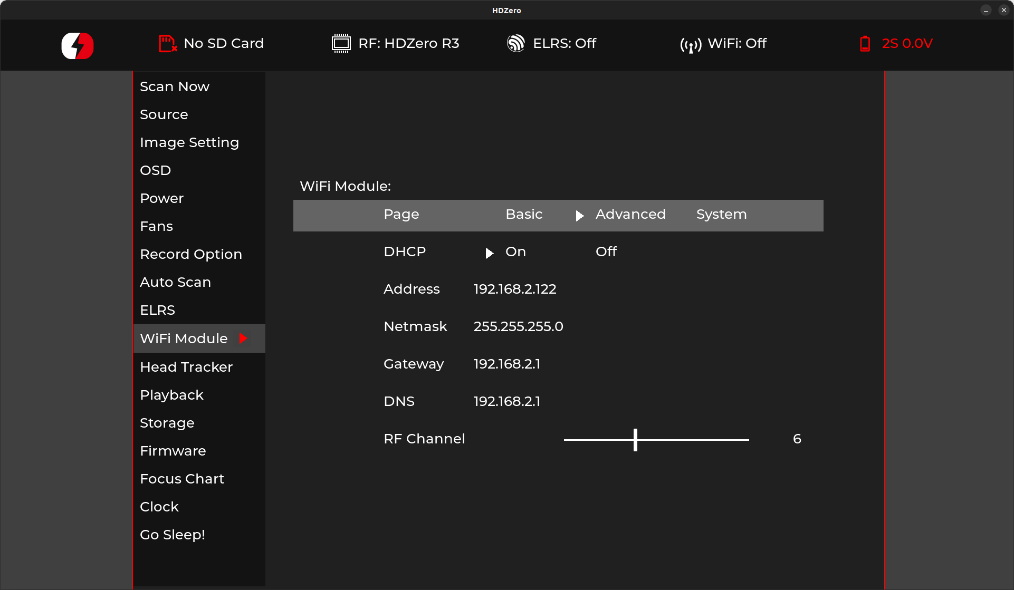
Advanced Fields
DHCP – This setting only applies to Client Mode.
Note the Address specified will be requested for use by the WiFi. Ultimately it is up to the router to find and available address if the address requested is not in use, then the one specified will be used.
Address – The network ip address.
This setting applies for both Host and Client modes.
Netmask – The network subnet mask.
This setting applies for both Host and Client modes.
Gateway – The network gateway ip address.
This setting applies for both Host and Client modes.
DNS – the Domain Network Service ip address.
RF Channel – This setting only applies to Host Mode and a user can specify which radio frequency channel they want to communicate on.
System Fields
Root PW – Update the root password for the goggles.
This applies to SSH and SCP communications.
SSH – Enable/Disable Access to the goggles.
Defaults to disabled as a security precaution.
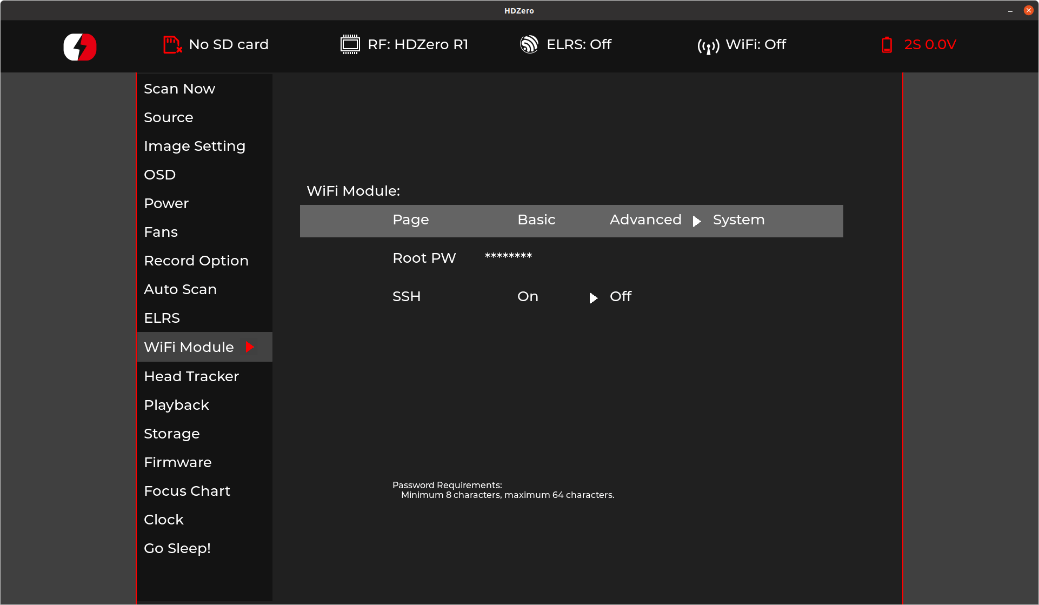
Finally, if either page is modified “Basic” or “Advanced”, the user must return back to the “Basic” page and select “Apply Settings” in order to configure the WiFi Module.
In order to establish a wireless video stream with the HDZero Goggles via a smartphone or computer, the user must follow these steps:
The “Basic” page within the WiFi Module page will contain the necessary information in order to establish communications with the HDZero Goggles:
a. Host Mode – Refer to the SSID and Password fields in order to join the HDZero Goggle wireless network.
b. Client Mode – Refer to your wireless access point user manual.
Install VLC app (or other similar app that supports RTSP) on your device.
Open the above app, choose “Open Network Stream”, and type the RTSP URL provided by the “Basic” page footnote as it will provided the necessary URL in order to establish a video stream via VLC app, below is the default ip address if the user has not made modifications within the “Advanced” page:
rtsp://192.168.2.122:8554/hdzero
Video latency is expected due to networking protocols, buffering schema of the app, and OS platforms.
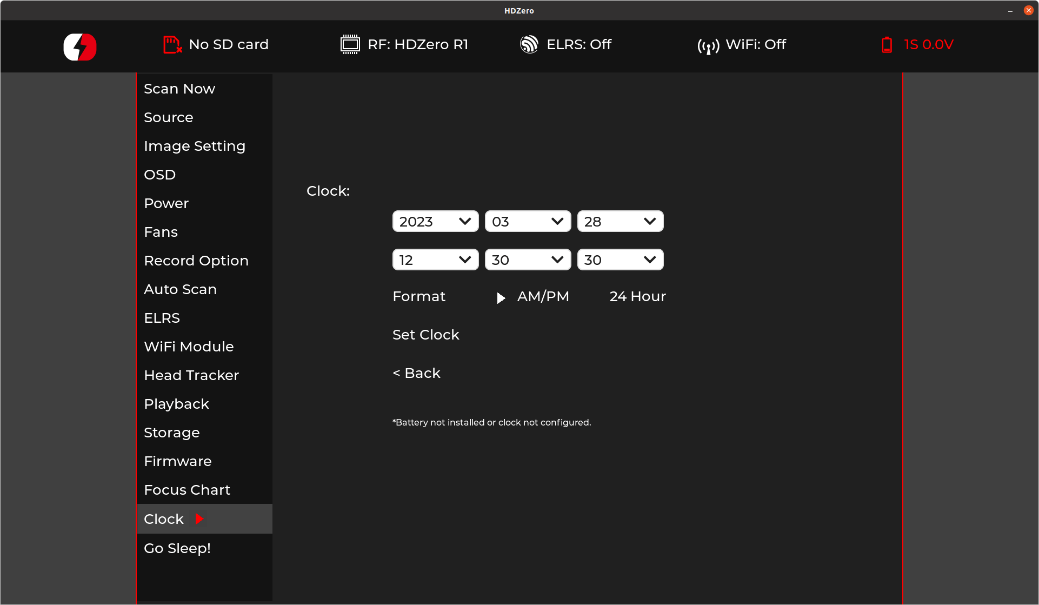
Real Time Clock
The HDZero Goggle includes a Real Time Clock (RTC). Goggle 1 is shipped without a pre-installed battery, whereas Goggle 2 comes equipped with one. If the battery is missing or depleted, the device will lose its stored date and time information. However, the RTC can still be configured via the Clock Page which will set the system clock and hardware clock upon invoking “Set Clock”. For users who have installed an aftermarket battery this only needs to be done once. Otherwise, when the goggle boots up it will revert to the last date and time the user had specified since applying “Set Clock” command.
An aftermarket battery could be CR2032 laptop battery with MX1.25-2P male connector. An example can be found here.
Note: It is user’s full responsibility for any damage due to opening the goggle to install the battery.
 Eason FPV