Setup
The HDZero goggle has many features that can be customized to the individual pilot.
Recommended Setting
Power Switch
There is a sliding power switch on the right side of the goggles. You may use it to turn on/off the goggle, or just leave it on and plug/unplug the DC barrel plug to turn the goggle on and off.
In order to prevent voltage spikes entering the goggle, it is mandatory to plug in a 6S (max 4.2V /cell) battery only if the power switch is off.
Power Input/Consumption
The goggle supports 7-25.2V power input 1. Please make sure the power polarity is correct 2 (Center pin positive) before powering on the goggle.
TABLE 1. Power Consumption
| Mode | Power Consumption | |
| 1 | HDZero Digital | 1.2A@12V |
| 2 | Expansion module+ IRC RapidFire3 | 0.9A@12V |
| 3 | AV In | 0.7A@12V |
| 4 | HDMI in | 0.7A@12V |
WARNING
Notes:
DO NOT use a 6S or above HV lipo to power on the goggle, it will permanently damage the goggle.
18650 battery cases can kill your goggle (blow the fuse). Always install batteries in correct polarity, check with case's battery checker beforehand, if the checker lights don't turn on, the batteries are installed backwards and the goggle's fuse will blow to protect the goggle. This can be repaired by replacing the fuse inside the goggles, but at owner's own cost.
RapidFire is a product of ImmersionRC limited. It is not included.
XT60 Cable
The goggle includes a 1200mm XT60 cable for connecting a battery in your pocket. You may also purchase a shorter 90mm cable on HDZero shop if you wish to locate your battery on the goggle head strap.
The XT60 cable (either 1200mm or 90mm) has no voltage regulator. The cable passes voltage directly through the goggle.
WARNING
Notes:
Do not connect an over 6S battery to the goggle, as the maximum voltage rating of the goggle is 6S (4.2V/cell).
Some types of XT60 cable, i.e., HDZero VRX cable, has integrated DC regulators. Make sure that cable is able to output enough current as indicate at Table 1. The goggle won’t boot or keep rebooting if there if that happens.
Face Plate/Padding Foam
The goggle includes both a wide face plate and a narrow one. You may choose the appropriate one to fit your face, and use the included 7mm thick foam padding for both comfort and preventing light leakage.
Optical Adjustment
After goggle is powered on, you will see an image on the OLED displays. Complete the following steps to adjust the optics:
Focus adjustment: Close one eye and slowly twist the focus knob on that side of the goggle until the image comes into focus. Once it works well with one eye, repeat the process with the other eye.
IPD adjustment: Close one eye and slide the knob to center the image. Once the image is centered, repeat the process with the other eye.
Fine adjustment: Open both eyes and look at the merged image. Make small adjustments to the focus and IPD for each eye until it feels visually comfortable and merges into a single clear picture.
WARNING
Notes:
- Do not expose the lens directly to sunlight. Otherwise, the OLED displays might be damaged.
- The optical module surface of the HDZero goggles is coated. If wiped forcefully, it may leave permanent scratches that cannot be repaired and are not covered under warranty. It is recommended to use the cleaning cloth provided with the goggles, avoid applying pressure, and wipe gently with care. Microfiber cloths can trap dust or debris that may scratch optical coatings, and you should never wipe the lens with your shirt. The safest method is to use a single-use eyeglass cleaning wipe (Zeiss is a popular option), and always wipe gently without applying pressure.
Head Strap
The goggle includes a 50mm (2 inch) wide head strap with battery pocket. Once you have configured the face plate and padding foam for your preferred face fit, put on the head strap and adjust the tightness to your preference.
HDMI input
The HDZero goggle includes a single port HDMI 1.4b receiver through a mini HDMI port. The incoming HDMI video is routed to the OLED display without adding any frame buffer latency.
Please note that most HDMI connectivity issues are due to either incorrect monitor settings or a faulty HDMI cable. If you encounter issues using the HDMI input, try connecting with alternative HDMI sources and alternative cables to rule out these common causes.
The current firmware supports resolution up to 1080p60 and 720p100 for HDMI input.
HDMI Output
The HDZero goggle includes a high-performance single channel HDMI transmitter that is fully compliant with HDMI 1.3a through a mini HDMI port.
The HDMI output will display exactly the same content as what appears on the OLED displays.
TABLE 2. HDMI Output Format
| Input Source | HDMI Output format | |
| 1 | HDZero 60fps Camera | 1280x720x60fps |
| 2 | HDZero 90fps Camera | 1280x720x90fps |
| 3 | NTSC | 1280x720x59.97fps |
| 4 | PAL | 1280x720x50fps |
| 5 | HDMI in | Not supported |
AV input
The HDZero goggle supports AV input through a 3.5mm AV jack. The pinout is shown in FIG 1.
The AV input cable is not included. It is available on the HDZero shop and other online stores.
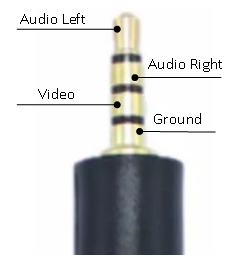
FIG 1. AV input Jack
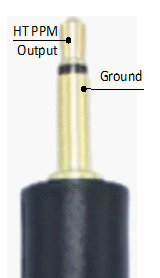
FIG 2. HT output Jack
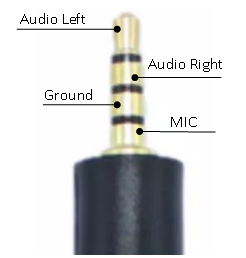
FIG 3. Line In/Out Jack
Expansion Module Bay
The HDZero goggle has an expansion module bay for installing expansion module that supports analog receiver and/or WIFI modules.
TIP
Notes:
HDZero goggle provides 5V power to analog receiver and in-takes its CVBS output. There are no control signals from the goggle to analog receiver. You need to tune analog receiver’s channel and menu setting by its own buttons and display.
There are two-row pins on the connector of expansion module, and a two-row socket on goggle. Make sure these 2-row pins are well seated into the 2-row socket. Analog receiver will not be able to power up if 2-row pins is one row down.
Expansion Module
Expansion module V1 supports analog receiver only, and V2 supports both analog and WIFI. Expansion modules are sold separately.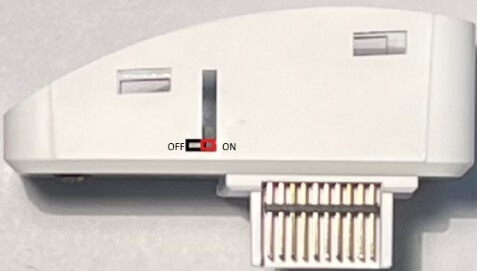 Some of expansion module may have a physical switch to power on or off the inserted analog receiver. The switch does not control the power of WIFI circuit of V2 modules.
Except some early version of Goggle 1, all HDZero Goggle 1 and 2, there is a soft switch available in the goggle menu to turn on the power to module bay. Please note that early expansion modules cannot be controlled by this soft switch.
TIP
Notes:
The soft switch must be turned on for the module bay to be powered and is off by default.
For Goggle 2: Although Expansion module V2 supports both analog and WIFI, its WIFI function is disable when it is insert to a Goggle 2 that has built-in WIFI already.
HT Output
The HDZero goggle has a 6-axis smart inertial measurement unit for head tracking pan+tilt support. The HT output jack pinout is shown in FIG 2.
The HT cable is not included. It is available on the HDZero shop and other online stores.
Audio Line In/Line Out
The HDZero goggle has a CTIA standard 3.5mm Line in/Line out jack for microphone and headphones. The pinout is shown in FIG 3.
Mounting Rails
The HDZero goggle has a unique mounting rail for patch antennas or whatever else you might want to mount.
Here is mount adapter for TrueRC patch antennas by Ryan Quellet, and ball joint rail mount by userzero1.
FW Port
The FW port is used for flashing firmware to HDZero VTXes. A 150mm programming cable is included.
The instruction for flashing VTX firmware is described on HDZero Firmware Update section.
Open Source
The HDZero Goggle is open source. You can find the SoC Firmware and Goggle CAD files at Github.
 czhou1972
 Eason FPV
 Ligen
Ligen